
It's Pickle Time!
- Aug 13, 2021
- 4 min read
It is that time of year when cucumbers abound in my garden. My favorite variety to grow is actually called Homemade Pickles Cucumbers. I like to buy them from Annie's Heirloom Seeds, but this year I was too late in ordering and could not find them easily! So, I grew other varieties including my new favorite - Korean Cucumbers. The seeds were gifted to me from my mom, and even though I usually only plant organic or heirloom seeds, I have no idea about these since the label is all in Korean. Regardless, there is no denying how delicious these cucumbers are! They are the long, skinny ones pictured below.

What is lactofermentation?
There are different ways to make pickles, but this recipe is a lactofermentation method. Lactofermentation is the process by which natrually occuring lactic acid producing bacteria (mostly lactobacillus) convert sugar into lactic acid while under anaerobic conditions. Lactic acid is a natural preservative that inhibits the growth of other harmful bacteria and acts to preserve food.
Now, why bother with lactofermentation? -- First of all, taste! Second of all, your microbiome!
You've undoubtedly heard about the benefits of probiotics and the importance of having a balanced microbiome (the microbes that live in your gut and all over your body). Eating foods that are lactofermented is the original way people have populated their guts with beneficial microorganisms. If you are buying pickles in the store, look for ones that are kept in the refrigerated section. These will be lactofermented. The shelf stable pickles do not have this probiotic benefit. Having a balanced microbiome has been shown to be important for everything from digestion to mood to blood sugar control to weight loss, and more. And did you know the majority of our bodies are made up of microbial cells, not human cells? This is a fascinating area of study, but for the purposes of this article, I will leave it at that.
Recipe
So, back to lactofermentation. I've been experimenting for several years, and I learned a lot last year from watching this video from Rainbow Gardens. Though she is pickling jalepenos in this video, some of what I learned was the importance of sterilizing my equipment, and I started using Pickle Pipes on her suggestion.
Supplies & Ingredients:
Mason jars - quart size
Pickle pipes, air locks, or mason jar lids & rings
Kosher (or other non-iodized) Salt - 40g per liter of water
Cucumbers (washed well)
Dill seed or fresh dill seed heads - 2 seed heads per jar, or 1-2 tsp of dried seed
Garlic - 3 cloves per jar
Other spices such as whole peppercorns, whole mustard seed, or pre-blended pickling spices - 1 -2 tsp per jar
Instructions:
Step 1. Sterilize the jars you will be using to make your pickles in.
I do this by putting water in a pan and bringing it to a boil with my jars facing upside down in the water. After 10 minutes in this type of water bath, the jars are sterile. Other equipment, such as lids and pickle pipes can also be sterilized in the pan at the same time. But I learned the hard way not to put my glass weights in the pan - they broke!
Step 2. Make your brine.
I have begun to use a 40% brine for all my lactofermentation. This means using 40% salt (I use kosher salt) to 1 liter of water (I use reverse osmosis from my filtration system). To get the measurements right, I measure my salt on a scale and then add it to 1 liter of water that I measure by using a 1 liter seltzer bottle.
Step 3. Fill your jar with spices.
For this batch, I used 3 cloves of garlic, 2 dill seed heads from my garden, 1 tsp of whole black peppercorns, and 1 tsp of a store-bought pickling spice mix per jar.
Step 4. Put your thoroughly washed cucumbers into your jars.
Try to pack them as tight as you can to get as many in as possible and to keep them from floating upward in the jar. I generally use glass pickle weights at the top of my jar to keep everything below the surface, but having them packed in firmly is always a good idea.
Step 5: Fill the jars with your brine
Step 6: Put in your weight and your cap with your pickling lid of choice.
As you can see below, I experimented this time with using pickle pipe lids vs. an air-lock lid. The only issue I had with the air-lock is that I could not fit the glass weight in the jar and use the air-lock device, so I did not use a weight. This might have contributed to why the top pickles in that jar did not taste right.
Step 7: Wait (and burp your jars)
The air-lock device removes the necessity to burp your jars, but if using a pickle pipe, squeeze the top daily to release the build up of CO2. If using a regular mason jar lid, just unscrew it daily, then tighten it back down. I usually like my pickles after just 3 days on my counter.

Sterilizing jars in a 10 minute water bath.

Weighing salt for a 40% brine
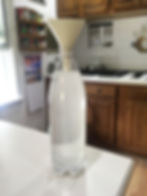
Using a 1 liter container to add the 40g of salt to the proper amount of water to salt for a 40% brine.

Jar filled with garlic and dried dill seed heads.

Jars filled and ready to start the lactofermentation process. The jar in the middle has an air lock lid and it is my first time trying out this method. The jars on the ends are capped with pickle pipes and have glass weights to keep everything below the brine.

The final results after 3 days of fermentation. The jar on the left came out the best. The middle jar and jar on the right look like they have less inside them because they do. When I opened the jars to taste them, the pickles on the top of both jars had a flavor that was not quite right and the pickles were not crisp. So, I just removed them, and the ones that were lower in the jars taste great and are crisp. I'm not positive what the issue was, but it may have been an issue with the cucumbers not actually staying below the liquid surface. The jar on the right had glass weight which had a crack in it, and the air lock lid in the middle jar did not allow enough room for a weight to be used at all. In any case, these are now ready for the refrigerator to slow down any further fermentation. And they are yummy!


